How to Get Started Backcountry Skiing & Snowboarding
And we also have a weapon: a whole slough of new backcountry-ready gear that’s designed to help previously inbounds-only skiers start exploring the mountains under their own power.
The last part of that equation, that we so desperately need, is avalanche education. The mountains don’t care that you’re only in that slide path because you lost the ticket lottery, they’re still happy to shed their snow onto you. So we’ve put together this list of free avalanche education resources that new skiers can use to learn the dangers of avalanche terrain, and more experienced skiers can stay sharp. As the number of new backcountry users increases, we want to keep that from translating into an unprecedented number of avalanche incidents. Use these resources to do just that!
Important: You should always carry an avalanche beacon, shovel, and probe when travelling in avalanche terrain and know how to use them. Backcountry travel requires an acceptance of the risks involved (avalanches are not the only danger) and implies a willingness to take responsibility for educating oneself about these dangers and ways to mitigate them. We recommend that backcountry travelers take a certified Avalanche Level One class or the equivalent, and practice the skills they learn there regularly with their partners.
What is Backcountry Skiing & Snowboarding?
The word "backcountry" is a catch-all term for a few different types of riding, which makes it a bit confusing to pin down exactly what people are talking about when they use it. At its most basic, backcountry skiing or snowboarding is any time you ride down a slope that’s not within the maintained and controlled boundaries of a ski resort. If there’s no ski patrol, you’re in the backcountry. That being said, there are two categories that most backcountry riding falls into.
Lift Accessed Backcountry, Sidecountry, or Slackcountry
Lift accessed backcountry, also called "sidecountry" or "slackcountry," is the first foray into the world of backcountry skiing and snowboarding for many riders. In lift accessed backcountry riding, you take a chairlift up the hill and exit the ski area through a controlled backcountry gate. One moment you’re in bounds, the next you’re in the backcountry. Even though you’re still close to civilization, you’re now entering terrain that has not been controlled for avalanches and isn’t covered by ski patrol sweeps. You’re on your own, and are now completely responsible for your safety and that of your partners. As such, you should have all your backcountry gear and training before you leave the resort. That means a beacon, a shovel, a probe, a partner, and a plan.
Additionally, when riding lift accessed backcountry, knowledge of your planned ski route is even more important. You often don’t get a view of your route on the way up, the ski lifts can take you into very serious terrain, and although the backcountry gates are usually accessible without ski touring equipment, the bottoms of the runs sometimes are not. It’s easy to pop out into the sidecountry and find yourself cliffed out, or to reach the bottom of a gully and realize you don’t know where you are or have the right equipment to get yourself out.

A typical backcountry gate as seen from the resort side: "The area beyond this sign is not patrolled and may not be subject to avalanche control. Avalanches may occur and other natural and man-made hazards exist. Rescue will be provided at the rescued party's expense."
Human Powered Backcountry
For many people, this is what comes to mind when they think of true backcountry skiing. You start at a trailhead somewhere, make your own way up the mountain, and ride some truly wild terrain back down.
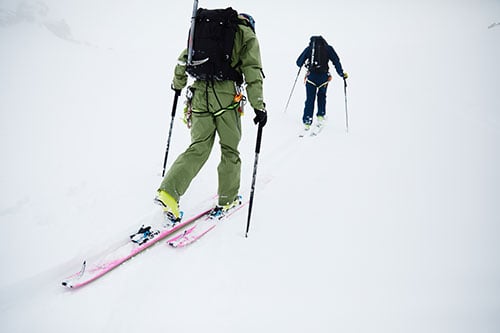
The most common way of doing this is by using touring skis or a splitboard, and equipping them with climbing skins to get you up the hill. As such, people will often just say “touring” when referring to human powered backcountry riding.
Getting Started Backcountry Skiing & Snowboarding
Before you drop everything and burn rubber to the nearest trailhead, you’ll need to equip yourself with the skills, and knowledge required to manage the inherent risks of exploring wild snow-covered terrain. Here, we cover the basics of getting started in the backcountry so you can dive in with confidence.
What skiing and snowboarding ability level is required to ride in the backcountry?
Before you venture outside of the ski area boundaries, it's a good idea to make sure you're comfortable navigating untamed and unfamiliar terrain, and descending in less-than-perfect snow conditions. While everyone hopes for fields of untouched powder, in reality you'll encounter a wide variety of challenging types of snow in the backcountry, sometimes all on the same tour! From firm crusts and ice first thing in the morning to sloppy, heavy snow in the afternoon; sometimes the snow is your greatest challenge. A great first step is to get used to exploring off-piste back bowls and inbounds terrain that require some hiking before you head out any gates into backcountry terrain.
Can I use my regular alpine skis or snowboard in the backcountry?
Yes and no. Most lift-accessed backcountry riding allows the use of your normal alpine ski gear or freeride snowboard setup. Getting to your line may entail some booting or traversing, but you are usually (but not always) able to ski right back to the lifts for another lap. However, if you want to access deeper backcountry terrain, you'll need to invest in special gear that allows you to walk uphill. For skiers, this will usually mean mounting your skis with touring bindings and climbing skins. Snowboarders will require a splitboard, a special type of snowboard that splits into two, and bindings and climbing skins to go with it. But there are many options when it comes to touring gear and lots of things to consider! Read on about backcountry-specific gear in our Intro to Backcountry Ski & Snowboard Gear guide.
What additional skills, knowledge, and gear do I need?
Once you're in the backcountry, you’re on your own. There’s no trained rescue professionals and no one to tell you what's a green circle and what's a black diamond. In addition to being able to ski a variety of snow types, you should at a minimum be comfortable assessing terrain, evaluating hazards, and responding to things going haywire. If your partner gets hurt or caught in an avalanche, you are the only person around to save their life. In order to understand and manage the inherent risks of riding untamed terrain, you should take an AIARE Level 1 Avalanche Class and carry avalanche safety gear with you every time you go.
Take an Avalanche Class
First of all, no amount of free resources is a substitute for a true avalanche class. It doesn’t matter that your partners know a lot about snow science, or you read the right books. You need to take a formal Avy 1 class before you head into uncontrolled avalanche terrain.
There are a whole slew of classes available. There are three main groups in North America that offer avalanche education: the AAI (American Avalanche Institute), American Institute for Avalanche Research and Education (AIARE), and CAA (Canadian Avalanche Association.) All three of these organizations offer a variety of classes that cover generally similar skills and knowledge.
For beginners there are two main courses to look at: a “Rescue Fundamentals” course and a full Avy 1. Rescue Fundamentals courses, sometimes called “Avy Awareness” courses are usually one-day classes that cover the absolute basics of what gear you need to travel in avalanche terrain and how to use it. Some Avy 1 courses require them as prerequisites. It’s a good idea to take one now if you think there’s any chance you’ll be interested in backcountry skiing in the future. They do a good job of laying the groundwork for higher education. Once you’ve got that out of the way, sign up for your Avy 1.
Americans can take an Avy 1 through either the AAI (American Avalanche Institute) or the American Institute for Avalanche Research and Education (AIARE). Canadians, meanwhile, will likely take an AST 1 class. All of these classes cover the same general info and will set you up with the fundamentals so that you can go on to continue your education in a less formal way. Find a class near you, sign up, and take it seriously. It doesn’t matter how much experience you have, or how much you’ve read, the teachers of these classes have a huge amount of local experience and specialized knowledge to pass on to you. Do your best to retain it all. This is life-saving information.
Check the AAI’s and the AIARE’s websites to find classes near you. It’s also worth talking to the outdoor programs at any colleges near you, they often team up to offer Avy 1 classes.
If you took an Avy 1 a few years ago, now would be a good time to take a refresher course. Avalanche knowledge is a use-it or lose-it skill. And since we can only ski for about half of the year, there’s a lot of time for that information to leak out of our brains. Take a refresher course every couple of years.
The rest of the resources on this list are meant to be used in addition to that Avy 1 class. They’ll help you stay current and up-to-date through the winter, but they’re no substitute for that formal class.
Follow the Snowpack - Your Daily Avalanche Forecast
Once you have your AIARE Level 1 Certification (Avy 1 for short), the next crucial step toward being safe in the backcountry happens in your own home before you even step outside. The best way to stay safe is to evaluate the danger before you go, and to stay home on days that are far too risky. As snow people, our general reaction to seeing heavy snowfall in the evening is to immediately start dreaming of powder day face shots in the morning. But this kind of riding is generally best to leave in the resort. All that unconsolidated blower pow is fun to ride when there’s a team of professionals bombing it and mitigating dangerous zones, but in the backcountry, it’s as clear a sign of high risk as you can get. Generally, you want to wait a few days for the fresh snow to bond to the layers below it before venturing out.
If you live in a mountainous area with avalanche terrain, chances are that you have a local avalanche center that puts out forecasts all winter long. Those forecasts are your bible. To find your local avy center either just google the name of your local range + “Avalanche Center”, download the Avalanche Forecasts app, or visisit avalanche.org. It’s free, and it gives you a map overlay of every avy center’s reporting area in North America. From there you can scroll to where you’ll be skiing and figure out what center does your local reporting. Your local avy center puts out their reports for free. Consider donating to them.
These avalanche centers produce daily reports that communicate danger on a 1-5 scale from Low to Extreme for a range of elevations and elaborate on specific hazards and slope aspects you should be cautious of. By following the storm cycles in your local region, and using the daily avy forecast as a guide, you can make informed plans and safe objectives for the day or decide if the backcountry itself is a risk that should be saved for another day entirely.
US & Canadian Avalanche Centers
- Alaska Avalanche Information
- Center Bridgeport Avalanche Center
- Bridger-Teton Avalanche Center
- Central Oregon Avalanche Center
- Colorado Avalanche Information Center
- Chugach NF Avalanche Center
- Crested Butte Avalanche Center
- Eastern Sierra Avalanche Center
- Flathead Avalanche Center
- Gallatin National Forest AvalancheCenter
- Hatcher Pass Avalanche Center
And here’s a link to the Avalanche Canada website which helps you find the Avy center that forecasts for your area: https://www.avalanche.ca
It is important to recognize that this safety equipment serves the purpose of aiding in the unfortunate situation where there is an avalanche and potential burial. This is not a situation you want to get into, and the most important thing you can do is avoid this situation altogether. Even with proper rescue technique, the chance of survival in an avalanche is very low. You must ask yourself, “would I ski this without a beacon, shovel, and probe?” If the answer is no, then you shouldn’t ski it with that equipment either. The most important tool you carry with you is your brain.
We recommend that backcountry travelers take an AIARE Level One class or equivalent and practice the skills they learn there regularly with their partners. Here are some great resources for avalanche safety education:
— American Institute for Avalanche Research and Education
— American Avalanche Association
— Northwest Weather and Avalanche Center
— Avalanche Canada
You should carry an avalanche beacon, shovel and probe when travelling in avalanche terrain and know how to use them. Backcountry travel requires an acceptance of the risks involved (avalanches are not the only danger) and implies a willingness to take responsibility for educating oneself about these dangers and ways to mitigate them.
Tired of Ski Boot Pain?
The evoFit program was designed to provide skiers with a high-quality custom boot fitting that balances comfort and performance for a wide variety of skier types. Learn more here, or visit any of our stores in Seattle, Portland, Denver, Salt Lake City, or Whistler for more details.Learn More With Our Other Backcountry Guides:
- Backcountry Basics - How to Get Started
- Backcountry Gear - Checklist
- Backcountry Backpacks - How to Choose
- Avalanche Beacons / Transceivers - How to Choose
- Avalanche Shovels - How to Choose
- Avalanche Probes - How to Choose
- Avalanche Airbags - How to Choose
- Alpine Touring Skis - How to Choose
- Alpine Touring Ski Boots - How to Choose
- Alpine Touring Ski Bindings - How to Choose
- Dynafit (Tech) Bindings - Getting Started
- Backcountry Basics - How to Skin
- Climbing Skins - How to Choose
- Climbing Skins - Size Guide
- Climbing Skins - Weight Chart
- Climbing Skins - How to Cut/Trim
- Outerwear & Layers - How to Dress for the Backcountry
- Splitboarding - How to Get Started
Discover Our Favorite Gear:
This is evo. We are a ski, snowboard, wake, skate, bike, surf, camp, and clothing online retailer with physical stores in Seattle, Portland, Denver, Salt Lake City, Whistler, and Snoqualmie Pass. Our goal is to provide you with great information to make both your purchase and upkeep easy.
evo also likes to travel to remote places across the globe in search of world-class powder turns, epic waves, or legendary mountain biking locations through evoTrip Adventure Travel Trips. Or, if you prefer to travel on your own, check out our ski & snowboard resort travel guides and mountain bike trail guides.
Still have questions? Please call our customer care team at 1.866.386.1590 during Customer Care Hours. They can help you find the right setup to fit your needs.